
Want to setup Klipper’s input shaper, but don’t have a Raspberry Pi Pico on hand for a separate Klipper MCU? This article will step through using an Arduino Nano instead. A separate Klipper MCU in this context would allow you to run input shaper on multiple 3D printers by USB without requiring a dedicated ADXL345 sensor on each printer and reducing costs.
Wiring
Solder these pins together.

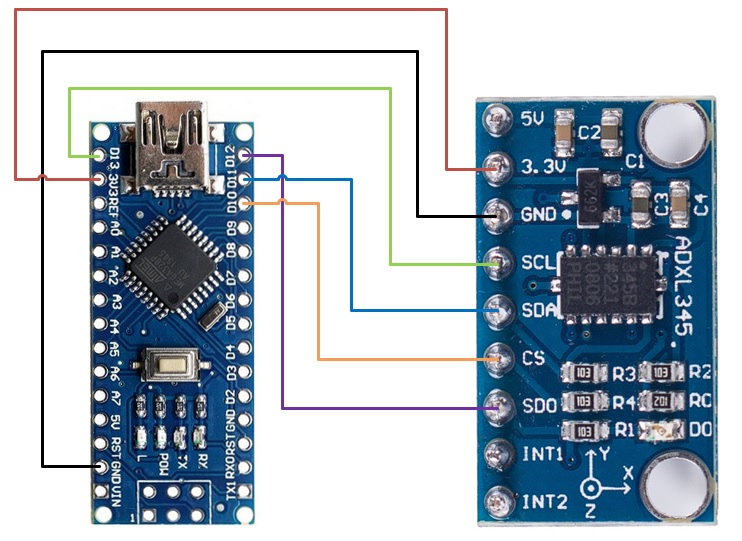
| ADXL345 | Arduino Nano |
| 3V3/VCC | 3.3V/VCC |
| GND | GND |
| CS | D10 |
| SDO | D12 |
| SDA | D11 |
| SCL | D13 |
Flashing
Connect the Arduino Nano to the Klipper Host, in our case a Raspberry Pi 4. In order for us to flash the Arduino Nano from our Raspberry Pi 4. At this time of writing, there is a bug in avrdude used to flash and we will need to add a previous APT repo.
sudo nano /etc/apt/sources.list- Add
deb http://raspbian.raspberrypi.org/raspbian/ buster main contrib non-free rpi - Save and quit (
:wq) sudo nano /etc/apt/preferences.d/avr-buster- Type below and save file
Package: avr-libc avrdud binutils-avr gcc-avr
Pin: release n=buster
Pin-Priority: 1001 - Save and quit (
:wq) sudo apt update
sudo apt install avr-libc avrdude binutils-avr gcc-avrcd ~/klippermake menuconfig- Change Micro-controller Architecture to
Atmega AVRand Processor model toatmega328p - Press
qandy make clean
makeavrdude -patmega328p -c arduino -b 57600 -P /dev/ttyUSB1 -v -D -Uflash:w:out/klipper.elf.hex:i
Note:/dev/ttyUSB1may be different on your system and per printer primary MCU. Change any reference to match further ahead.- Once this is completed, nano will be ready to be used as a Second Klipper MCU
Update 8/31/2023: For those whom wish to copy and paste into a terminal:
Steps 1-7 – Revert to older avrdude. Note: we didn’t test the newer version and may be fixed.
sudo sed -i '$ a\deb http://raspbian.raspberrypi.org/raspbian/ buster main contrib non-free rpi' /etc/apt/sources.list
echo -e "Package: avr-libc avrdude binutils-avr gcc-avr\nPin: release n=buster\nPin-Priority: 1001" | sudo tee /etc/apt/preferences.d/avr-buster > /dev/null
sudo apt update
sudo apt install avr-libc avrdude binutils-avr gcc-avr
Steps 8-13
cd ~/klipper
make menuconfig
make clean
make
avrdude -patmega328p -c arduino -b 57600 -P /dev/ttyUSB1 -v -D -Uflash:w:out/klipper.elf.hex:iKlipper Config
- Add a config file called adxl.cfg under the Klipper config section for each printer.
- Add the following lines:
[mcu arduino_nano_adxl]
serial: /dev/ttyUSB1

[adxl345]
cs_pin: arduino_nano_adxl:PB2

[resonance_tester]
accel_chip: adxl345
probe_points:
100,100,30- Press save & close
- Add
[include adxl.cfg]to printer.cfg
Note: if it is not connected to the printer add a#in front of it to disable - Press save & restart