We had upgraded our Ender 3 to Marlin 2.0.5.3, this will provide the steps that we did. As noted, we are using the MKS Gen L board and not the board the Ender 3 comes with.
With the new Marlin firmware, it is better in our opinion to compile it via PlatformIO in Visual Studio Code than in the Arduino IDE. It is recommended to record any values stored such as current z-offset, extrusion settings, etc before flashing the updated firmware as these values will need to be placed back afterwards.
Environment Setup
Please follow these steps to setup the environment:
- Install Microsoft’s Visual Studio Code from https://code.visualstudio.com/
- Install the following extensions: PlatformIO (by PlatformIO) & Auto Build Marlin (by Marlin Firmware)
- Relaunch Visual Studio Code.
- Download Marlin Firmware Version 2.0.5.3 from https://marlinfw.org/ and extract the zip folder.
- Download the Ender-3 configuration from the Github repo as well: Link
Configuration
Let’s get started with configuring the project:
- Place the Ender 3 example config files (
configuration.handconfiguration_adv.h, optional_Bootscreen.hand_Statusscreen.h) that was downloaded under step 4 underMarlin/srcdirectory. - Click on the PlatformIO module in Visual Studio Code, click open project and select the directory where the
platformio.inifile is located - Modify the
configuration.has follows:- Remove
#define CONFIG_EXAMPLES_DIR "Creality/Ender-3/CrealityV1"line, it may have a different path - If the
_Bootscreen.hand/or_Statusscreen.hhas been copied; either to un-comment or comment (//) the lines beginning with associated lines beginning with#define SHOW_CUSTOM_BOOTSCREENand/or#define CUSTOM_STATUS_SCREEN_IMAGE - Change line from
#define MOTHERBOARD BOARD_MELZI_CREALITYto#define MOTHERBOARD BOARD_MKS_GEN_L - Change the stepper directions to opposite; end result values should be:
#define INVERT_X_DIR false,#define INVERT_Y_DIR false,&#define INVERT_Z_DIR true - Change the extruder direction to the opposite; end result value should be
#define INVERT_E0_DIR false - Make any additional changes you may need for your setup.
- Remove
- Modify the
Configuration_adv.has below:- Set the line
#define E0_AUTO_FAN_PINto#define E0_AUTO_FAN_PIN 7
- Set the line
Building the firmware
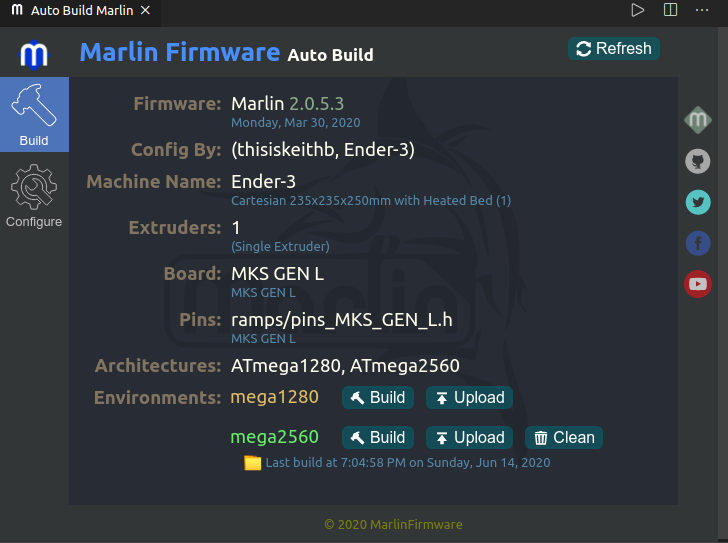
To build the firmware, the Marlin Auto Build extension will be used in Visual Studio Code:
- On the Marlin Firmware Auto Build extension, click
Refreshbutton. The values will be updated to what is in the configuration files. - Click on the
Buildbutton next tomega2560; this should give a succeeded message in the terminal output. If it doesn’t give a success message, please review the configuration files for configuration issues. - On successful build, plug in the MKS Gen L board via USB and press the
Uploadbutton.
After the upload, don’t forget to place back any custom values prior.
A good practice is to archive this firmware somewhere (plus a simple date stamp) where it can be used as a future reference to newer Marlin firmware versions.