Choosing Network Patch Cable Lengths

Setting up a computer network requires careful planning, and one important decision you’ll need to make is selecting the right patch cable lengths for the job. Patch cables are used to connect devices within a rack or between different racks, and choosing the right cable length is crucial to ensuring an efficient and easy-to-troubleshoot network.

When choosing patch cable lengths, it’s important to keep them short but not too short. For instance, 6-inch patch cables are ideal for connecting devices/patch panel ports within a single rack unit (U), which is 1.75 inches tall. Longer cables will create clutter and strain on the cable. A 1-foot patch cable is usually sufficient for as many as six rack units.

However, calculating the appropriate cable length can be more complex when the path goes in different directions or depths within the rack. In such cases, you’ll need to calculate the cable length based on the total inches required for the path. For instance, if the path goes in either horizontal direction, add 19 inches to the total vertical inches, then divide by 12 inches to obtain the cable length in feet. If the path goes from the front of the rack to the back, you’ll need to add the equipment depth to the total inches before calculating the cable length in feet.

Depending on the existing rack layout, it may also be necessary to add a service loop of 2-3 feet (24-36 inches) to allow for flexibility and future maintenance. Once you’ve determined the total cable length in feet, round up to the nearest foot. In some cases, it may be necessary to round up to the nearest foot ending with 5 or 0 when there is no pre-made cable length available that matches your requirements.

By following these guidelines, you can select the appropriate patch cable length for your computer network setup. This can help ensure optimal performance, efficiency, and easy maintenance, which are crucial for a successful network.

TLDR: Fast Formulas

Total Estimated Min Length (inches) = 1.75″ * (Rack U Height to Travel) + (if destination is not directly vertical from source in same rack, 19″) + (Device depth, if going from front to back of rack, commonly 21″) + (Any service loop required)

Total Min Length (Feet) = Round Up (Total Estimated Min Length (inches)/12)

UniFi – Log4j Vulnerability Notice

Update: 15 December 2021 – version 6.5.54 and earlier is vulnerable. Please update Unifi Controller again.

With the recent Log4j vulnerability, CVE-2021-442228, UniFi controller version 6.5.54 and earlier is vulnerable.

Jacobalberty has backported the fix to v6.0.45 and v5.14.23 for those whom are on the older hardware or controller versions.

For ours, we will be migrating to the latest v6 build by changing out Docker tag to “jacobalerty/unifi:v6” instead of “jacobalerty/unifi:stable-6” by following UniFi Controller – Docker Tag Change again with the tag changed.

References:

UniFi Controller – Docker Tag Change

While checking up on our UniFi controller image for updates, the tag “jacobalberty/unifi:stable” is no longer valid. There are 2 new tags instead, “jacobalerty/unifi:stable-5″ and ” jacobalerty/unifi:stable-6″. We will be upgrading to UniFi controller 6 with the tag “jacobalerty/unifi:stable-6.

WARNING: Upgrading the controller may invoke device provisioning, which may disrupt current service/s.

As a precaution, download a backup of the controller by going to Settings > Backup > Download Backup.

In our previous post UniFi Controller – Self Hosted Docker, our UNIFI_UID and UNIFI_GID were 1001, update the below ID numbers as required.

docker stop unifi
docker update --restart=no unifi
docker rename unifi unifi.old
docker run -d --restart=always --net=host --name=unifi -e RUNAS_UID0=false -e UNIFI_UID=1001 -e UNIFI_GID=1001 -v /var/docker_storage/unifi:/unifi jacobalberty/unifi:stable-6

After a minute of executing the last command, check the Unifi Controller web interface and everything works. Devices will start to re-provision.

If this is successful, run the below command for cleanup

docker rm unifi.old

If this fails, suggest starting over and restore the controller docker image with the backup that was downloaded at the beginning. Be sure to clean up the docker storage folder on the host prior.

UniFi Controller – Self Hosted Docker

One of the wifi access point brands that we’ve always recommend to family, friends, and others is Unifi. Usually, we end up having to do maintenance of their equipment. A solution is to setup an Unifi Docker container for a L3 management over the internet. Sure, we could set it up to phone home to UniFi cloud management, but what would be the fun of that?

We would like to note that we are not Docker experts or work with Docker on a daily basis and it’s something we would like to study more into when we have the chance. We are sure there is a more automated way to maintain the Docker image.

Step 1: On a Linux host, add a service account for Docker. Doesn’t need to be the same name. After adding the user, get the UID of the user, this will be referenced later.
sudo adduser docker_unifi

Step 2: Install Docker
curl -fsSL get.docker.com -o get-docker.sh
sh get-docker.sh

Step 3: Setup persistent storage.
sudo mkdir -p /var/docker_storage/unifi
sudo chown docker_unifi:docker_unifi /var/docker_storage/unifi

Step 4: Pull and create Docker Container

I’ll be using Jacob Albery’s container for Unifi. Use a container that you trust, at this time of this post, there was no official Unifi container.
docker pull jacobalberty/unifi:stable

To create the container, we will need the UID and GID of the non root user you’ve created in Step 1.
id -u docker_unifi
id -g docker_unifi

In this case, the UID and GID of docker_unifi is 1001.

The below command will create the Docker container and allow it to automatically restart if it ever crash and will not run as root. In this case, we are using L2 discovery to setup and firmware upgrade the APs on the local network. Otherwise, we would use network port forwarding.
docker run -d --restart=always --net=host --name=unifi -e RUNAS_UID0=false -e UNIFI_UID=1001 -e UNIFI_GID=1001 -v /var/docker_storage/unifi:/unifi jacobalberty/unifi:stable

To update this container in the future, use the following commands. Just be sure to remember what you used for creating the Docker container.

docker pull jacobalberty/unifi:stable
docker stop unifi
docker rename unifi unifi.old
docker run -d --restart=always --net=host --name=unifi -e RUNAS_UID0=false -e UNIFI_UID=1001 -e UNIFI_GID=1001 -v /var/docker_storage/unifi:/unifi jacobalberty/unifi:stable

If the upgrade was successful, remove the old container by using command:
docker rm unifi.old

Next is setting up external DNS.

External DNS – Setup

Since normal consumer external IP addresses usually change every so often and we needed to allow the firewall to only allow certain IP addresses as a source. An A or AAAA record will be needed to be updated dynamically by a client at the client’s location.

Luckily, we are able to setup the DDNS settings at these locations, each with their own unique API key following a naming convention and under a different domain name than the primary one utilized. If the client has a public domain name already, see if you can get them to setup DDNS on public DNS instead. We are using Cloudflare DNS nameservers and protections; this will be different depending on what you use.

We suggest making a subdomain that you only know and add sub-records to that.

For example:

  • A record for 1 client site
    • Host Name: c1.u.i
    • Proxy status: DNS only (do not use proxied, your firewall will block these)
  • A record for another client site
    • Host Name: c2.u.i
    • Proxy status: DNS only

If DDNS is configured correctly, the DNS records update with the correct IP addresses. Next we configure the firewall to only allow these certain FQDN.

Firewall – Setup

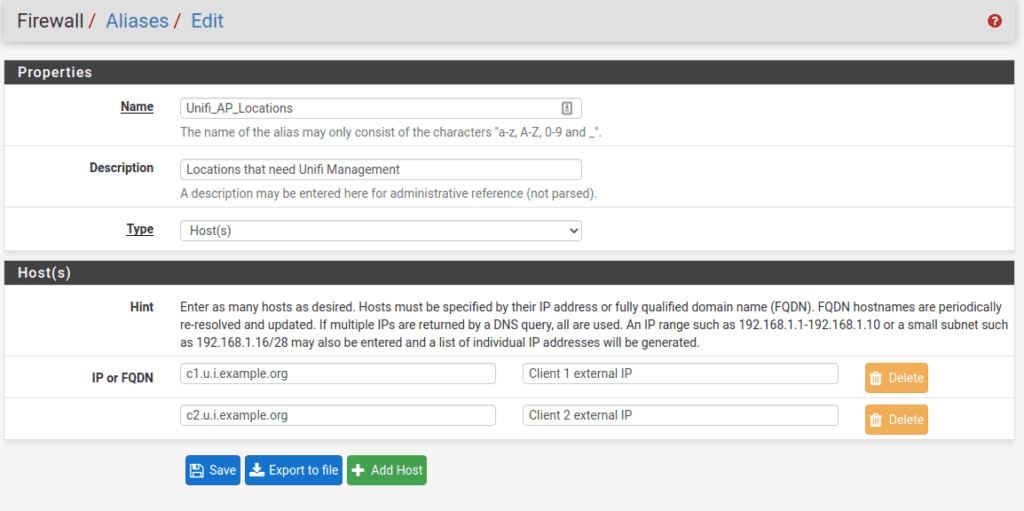
We use pfSense firewall here and the easiest way to setup the firewall settings and not having multiple repeating rules is to setup an Firewall Alias for both the Ports and Hosts allowed. Below is an example of the Hosts alias.

In the firewall rules, we set the Hosts Alias as the source, the destination, and the Port Alias for the allowed custom Ports. This would prevent usual internet background scans and malicious users/bots from seeing the ports are open.

As always, secure this environment with firewalls and within a DMZ network zone that is separate from your normal network and always keep this host and the Docker image updated. We allowed the following ports through the firewall defined here: https://help.ubnt.com/hc/en-us/articles/218506997-UniFi-Ports-Used#2

UniFi Controller – Setup

Be sure to set the Controller hostname to the FQDN and check the box to Override inform host with Controller Hostname/IP. Also, update this public DNS record to point to the Controller WAN IP address.

To remove/migrate a external client

  1. Migrate their Unifi Management 1st. Note: Site Export works wonders.
  2. Notify the DDNS record is no longer required (unless they set it up and want to keep it)
  3. If any, remove their public DNS entries & their DNS API access to your domain management
  4. Remove the FQDN name from the firewall host alias.

MikroTik Switch – Setup VLANs

I had purchased a MikroTik RB260GS (product link) to allow me to setup vlans for about $40 and later be able to setup a fiber run for a few remote devices.The MikroTik RB260GS is able to handle 802.1Q VLAN tags with 5 Gigabit Ethernet Ports and a single SPF cage. It can be powered by PoE (Power over Ethernet) on the 1st port and has a small form factor of 4 7/16 x 5 1/2 x 1 1/8 inches or 133 x 139 x 28 mm. There are larger and different models to choose from as well and should be considered depending on your needs.

From the beginning of trying to setup the VLANs, I had a hard time with this switch and a learning curve ahead of me for this solution. I hope this will assist those whom are having difficulties as well.

Port – Trunk

A trunk port is where multiple VLANs share the same physical connection and is used for the network backbone infrastructure up to the Access Level Switches.

Also, consider the amount of VLANs and traffic going through this port, it will be limited to 1 Gigabit and shared amongst all the VLANs going through it. Sometimes, it might be a better idea to have the SPF port be the trunk port with a 10 Gb fiber module. It would use less power, faster, lower latency, and electrically isolated from the other end of the trunk on this connection.

For this switch, it’s best for the trunk port to be port 1, especially if PoE is being delivered from another switch, or the SPF port. Below is how to configure the trunk port and can be any port on the switch.

  1. Navigate to VLAN tab
  2. Configure the port’s Ingress settings as listed:
    • VLAN Mode: Enabled
    • VLAN Recieve: Any
    • Default VLAN ID: 1
    • Force VLAN ID: Unchecked
  3. Configure the port’s Egress settings as listed:
    • VLAN Header: Add If Missing
  4. Navigate to VLANS tab , Add the VLAN numbers here.
  5. Make sure the Trunk port has all of the VLANs settings are set to Leave as is

Access Ports

These ports only have a single VLAN associated to them and is normally used at the Access Switch Level when end devices plug into.

  1. Navigate to VLAN tab
  2. Configure the port’s Ingress settings as listed:
    • VLAN Mode: Strict
    • VLAN Recieve: only untagged
    • Default VLAN ID: <Your VLAN ID here>
    • Force VLAN ID: Unchecked
  3. Configure the port’s Egress settings as listed:
    • VLAN Header: always strip
  4. Navigate to VLANS tab
  5. Make sure the Access port has all of the VLANs settings are set to Not a Member, except for the VLAN ID you’ve entered in step 2. It would be set to the value Always strip.

Multi-VLAN Ports

Sometimes there is a need where a port may need multiple VLANs going across it to a device, like a wireless access point. See below settings

  1. Navigate to VLAN tab
  2. Configure the port’s Ingress settings as listed:
    • VLAN Mode: Strict
    • VLAN Recieve: any
    • Default VLAN ID: <Your Default VLAN ID here, usually management VLAN ID>
    • Force VLAN ID: Unchecked
  3. Configure the port’s Egress settings as listed:
    • VLAN Header: always strip
  4. Navigate to VLANS tab
  5. Make sure this port has all of the VLANs settings are set to Leave as is except for the VLAN ID you’ve entered in step 2. This would be set to the value Always strip. The non-allowed VLANS on that port should be set to Not a Member

Testing your config

It’s best practice to test each port to see if the configuration is correct when doing this the 1st few times. Wireshark (link) will be your friend or even a simple checking of the IP range you receive will work for the most part. There are plenty of online tutorials with working with Wireshark and I will not cover them.